Sunday, July 1, 2012

DIY Stars and Stripes Patriotic 4th of July Manicure

DIY stars and stripes patriotic manicure


TOOLS & SUPPLIES:

• 2 colors nail polish (I used Alpine Snow and OPI Red )
• clear top coat nail polish
Star paper punch (1/4" size)
• sticky labels
• scissors
• toothpick (optional)
• tweezers (optional)


INSTRUCTIONS:

First paint your nails as you normally would with two coats of the color you want to use as your base. (I used OPI Red). Let this dry completely. Overnight is best, but at least let the polish cure for several hours so you don't mar the surface.

For the Stars, use the star punch to punch out as many as you think you may want to use from your sticky sheet label. We are going to use the negative shapes as a stencil.

The label sheet I am using is actually the scrap from when I print my shipping labels...you know I don't like to waste things!

Step 2: punch star shapes from label sheet


Use the scissors to cut tabs around the stars, long enough so they will overhang the end of your nail for easy removal after painting.


Step 3: Cut labels to create tabs around star shapes

Remove the back from the label and place the tab where you want to create your star shape on the nail. I liked mine off-center.  Be sure that the label is stuck firmly to your fingernail, especially around the points of the star.  Use the toothpick to press it down all around the edges of the star if you need to.

Step 4: press the tab firmly to the nail and paint inside the lines


Please note: this is the order in which I did things, but I would actually recommend doing all the cutting and placing of labels on all your nails before you paint your second color. I ruined a couple of my stars while messing with scissors, etc. and had to start over!

Step 5: Peel off the label while the polish is still wet and clean up any rough edgesUse your accent color to paint inside the star shape, two coats (the color I used is OPI Alpine Snow). Peel off the label while the polish is still wet. If you need to, you can use the toothpick to straighten any crooked points on the star. Mine needed a little help, but not bad for a first try!

For the stripes, cut thin strips in the label as even as possible. Make them long enough to overlap your cuticle and hang off the end of your nail.

I started with one stripe on my pointer finger, mainly because I wanted to test the technique and see how it looked. I thought I would add more afterwards, but it doesn't really make sense to paint one stripe at a time... and anyway, I liked it with just one, so I kept it!

If you want 3 stripes on one nail, you will need 4 strips since we're using the space between them for our accent color.


Step 6: Cut even strips in the label

Peel the back off the label and place the strips on your fingernail, as straight as possible and spaced according to the thickness of stripes you want.

Step 7: apply strips to fingernail as straight and evenly spaced as possible and press firmly.


Paint between the lines using your accent color, two coats, and peel the strips off while the polish is still wet. Tweezers come in helpful here for peeling off very thin strips without smudging the fresh paint.

Again, use the toothpick to clean up any edges - it can remove paint that goes outside the lines, or dip in polish and use a tiny bit to fill in any spots missed inside the lines.

Allow to dry, then finish with one to two coats of clear top coat nail polish.

DIY red and white stars and stripes patriotic 4th of july manicure


That's it! I hope you had fun reading this and got some ideas for your own nail art DIY manicures, whether it's for the Fourth of July or not! The possibilities are endless, why not see what you can dream up?

Feeling inspired by Independence Day? Try these Ten Fabulous Fun 4th of July craft tutorials too!


I linked up at:

Friday, June 29, 2012

Recipe: Delicious Bourbon Fudgsicles (grown-ups only!)

bourbon fudgesicles recipe


INGREDIENTS:
(Makes 6-8 pops)

• 1/2 cup granulated sugar
• 3.5 oz bittersweet chocolate (70-72%), chopped
• 2 TBS dutch-processed cocoa powder*
• 1/8 tsp salt
• 2 TBS bourbon* (see below for non-alcoholic suggestion)

Popsicle molds
Wooden popsicle sticks

bourbon fudgsicle recipe ingredients

bourbon fudgesicle recipe, chopped bittersweet baking chocolate
A glorious pile of chopped dark bittersweet baking chocolate!


DIRECTIONS:

Combine sugar, chocolate, cocoa powder, and salt in a saucepan with 2 cups of water. Warm over medium heat and whisk constantly until mixture just begins to boil. Remove from heat.

Transfer to a 4 cup glass measure or a bowl with a spout and leave at room temperature to cool for 30 minutes.

Stir in the 2 tablespoons of bourbon then pour into pop molds. Place in freezer and leave for about 3 hours without tops, then add the popsicle sticks and return to freezer for at least 4 more hours.

bourbon fudgesicle recipe; tovolo star pop ice molds

NOTES:

I used a set of these Tovolo Star Popsicle molds and got 6 pops plus a little extra that made for some damn good hot chocolate :)  These molds have their own tops, but I really prefer to use wooden popsicle sticks because they are longer and the pops stick to the wood better than the plastic (so, fewer instances of the stick coming out of the mold before the popsicle). If you want to cover the ends of the pops while they're in the freezer, use some plastic cling film over each one after they're frozen solid; just use the sticks to poke a hole in the plastic wrap.

*Dutch-Processed cocoa powder is an unsweetened cocoa that has been alkalized to neutralize the acid.  It has a more delicate flavor than the other kind of unsweetened cocoa powder, referred to as Natural cocoa powder which has an intense flavor and tastes quite bitter. Lindt is a popular example of Dutch-Processed cocoa, while Ghirardelli is a well-known Natural cocoa powder.

If you'd like to make a non-alcoholic version, leave out the bourbon and try adding a splash of vanilla extract (about 1/2 tsp). 


Thursday, June 28, 2012

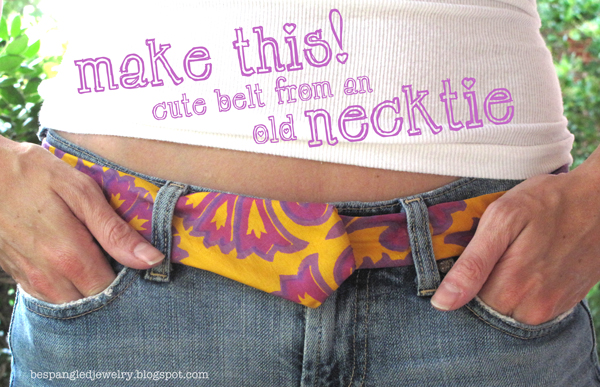
How To Make a Cute Belt from an Old Necktie!

Make a cute belt from an old necktie


This is my second project using the same tie; see how to make an iPhone or iPod pouch case from an old necktie if you want to see another fun tutorial!

SUPPLIES and TOOLS:
• 1 necktie
• marker
 rotary cutter or sharp fabric scissors
• ruler / straight edge
• cutting mat
• needle and thread
hook and eye closures


First, wrap the tie around your waist at the point you want to wear the belt. I actually tried mine on with my favorite pair of jeans to see exactly how long it would need to be to wear with those, figuring that would be the lowest I would wear it and therefore the longest measurement. I measured mine to overlap by about 6 inches at this longest length; I planned to place the hook 1" from the large end and the first eye 4" from the small end, plus I gave myself another inch to sew the end into a point.


So, mark your tie to cut where you like how much it overlaps and remember to give yourself an extra inch at least for finishing the cut end.

Step 1: measure your waist and cut the tie

Using a ruler and this Rotary Cutter on a cutting board, I cut off the extra fabric in a nice straight line, and set the extra piece aside for another project (that I'll share with you later!)

Step 2: Fold back the outer layer of fabric and cut the lining into a point

Now, fold back the outer layer of fabric about 1.5" and snip any stitches that are connecting it to the lining inside. Cut the lining into a nice point, using the other end of the tie as a guide for the angle if you like. I used sharp fabric scissors here.

Step 2: Fold back the outer layer of fabric and cut the lining into a point

Unfold the outer layer of fabric and make sure you have a nice amount overlapping the point so you can fold it in and cover all the lining.

Step 3: Cut the outer layer of fabric to remove excess

Working with the seam facing upward, cut the top part of the fabric into a point as shown above, keeping the same amount of fabric overlapping as before. That is to say, the lining and the outer layer follow the same angle but the lining is about an inch shorter than the outer layer.

I made some strange cuts (above) to the bottom of the fabric, just to get rid of some extra that would make it too bulky when tucked inside. This part is optional if you can manage to tuck the ends all in nicely without making it lumpy. 

Step 4: Tuck fabric inside itself and stitch in place


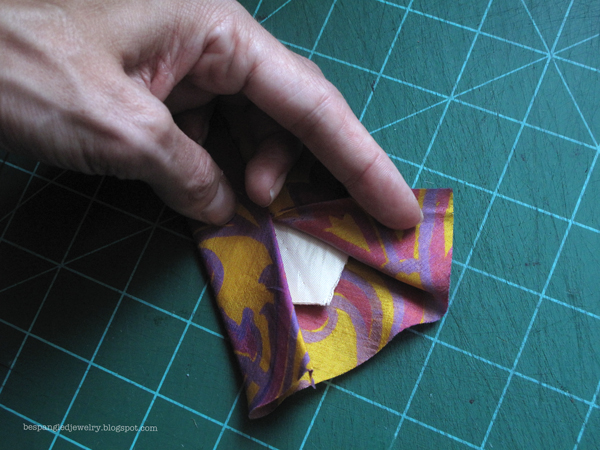
Still working with the seam upward, tuck the top pointed ends of the outer fabric inside the end of the tie, staying on top of the lining layer.  The bottom layer comes up and over the lining and tucks inside as well. We are trying to mimic the finished end of the tie as much as possible (above).  Use a pencil to help you tuck all the fabric as far in as it will go and as flat as you can make it.

With the needle and thread, stitch the ends into place without passing the needle all the way through to the other side of the tie, as this will be the front of the belt. You do want the thread to pass through part of the lining to hold it in place inside the silk.

I'm sure if you have even 2 minutes more experience sewing than me that you can do a much better job. I'm obviously a little out of my element here, but I do take great comfort in the fact that this is the underside of the belt that won't be exposed to critical eyes for the most part :)


Step 5: Sew hook to the large end of the tie belt

Now you're ready to sew the hook on to the underside of the end we just finished. I placed mine just below the V where all the fabric comes together; about an inch from the pointed tip.


Step 6: Sew bars to the length of the belt to complete the closure

Now that the hook is in place, wrap the belt around your waist again at the largest part you may ever want to wear it and use the marker to make a small dot on the top of the small end where the first eye will go. 

If you want to add more eyes to make a variable length belt, you can go ahead and mark those now too. I made my belt with three; one to fit my jeans around my hips, one to fit my actual waist at my belly button, and then one halfway between those, just for the heck of it. You can use as many or as few as you like.

Sew the eyes (or bars, as mine are) into place where you made your marks, and when you're done...you're done! Try on your awesomely adorable new belt and wear it proudly!

I'd love to see your tie belt if you make one like this - feel free to leave a link to your post in the comments here, and of course, I would appreciate a link back to this tutorial if you do use this post as inspiration for a project :)


This is the belt at the shortest length, around my waist. I think this would be so cute with a nice long summery white dress (that I don't have, of course...)


And with my favorite low-rise jeans!


MORE NECKTIE CRAFT PROJECTS (using the rest of this very same tie!) :


DIY: How to make a pretty pouch for your iPhone or iPod with an old necktie


I LOVE to be pinned on Pinterest :)  I hope you'll share with the world by pinning me if you like what you see here! 


Green Crafts Showcase

Wednesday, June 27, 2012

Necktie DIY: iPhone or iPod Pouch Tutorial


I've been having so much fun upcycling things lately. 'Re-fashioning' is very appealing to me; not only because it gives outdated things a new life, but because it lets me use my creative problem-solving skills and create something one of a kind! This is my entry for this month's Etsy Fort Worth Upcycle THIS! Craft Challenge. I will show you step by step how I made an iPhone pouch from one of my Dad's old (and I mean oooooold) ties!


As you can see, this tie is a lovely handpainted silk pattern in bright gold and various shades of lilac. Very Retro. Beautiful fabric, but a little garish to be worn as an actual necktie these days, don't you think? I thought it would make a beautiful little fold-over pouch, and I was right!

For DIY, keep reading & let's get started!

SUPPLIES and TOOLS:
• 1 necktie
rotary cutter or sharp fabric scissors
• ruler / straight edge
• cutting mat
• needle and thread
decorative snap buttons
snap fastener or snap fastening pliers


First, fold over the pointed end of the tie and measure from the straight edge that creates. I used a sharpie to mark at 6 and 1/2 inches, because that was a good size to fit my iPhone. If you are creating a pouch for another specific object, measure by sliding it inside the end of the tie, and fold over the flap as if you were closing the pouch. You want to make sure you leave yourself room for the seam at the bottom, so find the end of your object inside the tie and add at least 1/2", then mark for cutting.


I used a ruler and this awesome Fiskars rotary cutter on a cutting board to create a perfect straight cut. You can also use very sharp fabric scissors, of course. (Save the remainder of the fabric; I have some more fun Upcycled Neck Tie project ideas for you!!)


Turn your cut piece inside out. I left the lining of the tie in place, so I didn't have to re-stitch the seam. Plus, I thought it would be great to have that extra padding.


Stitch a straight line to close the end of the pouch, about 1/2" from the end of the fabric. I folded the corners in and sewed them down to create rounded corners for the pouch.  I trimmed the excess fabric using the ruler and rotary cutters again, and then turned the pouch right-side out again.


Using a faux pearl snap and these Dritz snap fastening pliers, I secured the bottom of the snap in place throught the fabric, about 1/4" down from the V of the pouch opening. Refer to your snap package for clear directions on assembling the pieces correctly.  The top of the snap has a different back piece than the bottom part of the snap.


I repeated the process for the top part of the snap, after rotating the bottom part of the jaw on the snap-fastening pliers. Refer to instructions from your particular fastening tool or pliers, and be sure to add the rubber rings to the jaws of the snap fasteners if they are included but not attached already.


That's it! It was super easy, even for someone like me who doesn't sew!


Want to buy the finished pouch? It's a one-of-a-kind piece, for sure. You can get it here(sold!)

I'd love to see your projects, please feel free to leave links to your own necktie-pouch creations in the comments below, and of course I would appreciate a link back to this tutorial if it has inspired you to post one of your own :)

Come back tomorrow for another Fun Craft Project - I'll show you how to make an adorable belt from an old necktie (using the rest of this very same tie)!

how to make a cute belt from an upcycled old necktie


I LOVE to be pinned on Pinterest :)  I hope you'll share with the world by pinning me if you like what you see here! 

Green Crafts Showcase
Visit thecsiproject.com

Tuesday, June 26, 2012

10 Fabulous Fun Fourth of July Craft Ideas!

10 fabulous fun 4th of july craft ideas!
I can't believe that July is just around the corner! To be honest though, it wouldn't really bother me if the summer flies by... after all my life in Texas, it still surprises me how hot it gets and somehow I'm never ready for the heat. I swear each year it's hotter than the last, and I know that the existence of global warming is a highly debated issue, but when you're already over 100º, trust me when I say that every half a degree increase counts. 

Anyway, enough blabbing about the weather; if I choose to live in Texas I probably shouldn't complain about the heat, right?

With Independence Day only a week away, I thought I'd do a nifty little 4th of July Craft Roundup for you to get your creative fireworks a-poppin'!  Here are 10 fun Red, White, and Blue craft tutorials for you to explore. Click on any photo or caption to be taken to the site where you'll find all the step-by-step instructions for each project. Enjoy!


4th of July tin can luminaries by www.crafts-for-all-seasons.com 

Happy Fourth of July, Everyone!


Feeling inspired by Independence Day? Try my fun DIY Stars & Stripes Patriotic Manicure!

I linked up at: