I also bought some new heart shaped cookie cutters (and a bunch of other fun stuff) with my Amazon gift card score from Christmas! I was thinking I would make some cute heart cookies, but what I was craving was chocolate, and when I think of chocolate I usually think of brownies, so I put two and two together... and there ya have it folks, an adorable Valentine's Day dessert was born!
Showing posts with label recipes. Show all posts
Saturday, February 1, 2014
Valentine's Day Strawberry Brownie Hearts {Low Fat!}
I also bought some new heart shaped cookie cutters (and a bunch of other fun stuff) with my Amazon gift card score from Christmas! I was thinking I would make some cute heart cookies, but what I was craving was chocolate, and when I think of chocolate I usually think of brownies, so I put two and two together... and there ya have it folks, an adorable Valentine's Day dessert was born!
Tuesday, January 28, 2014
Low Fat Chunky Fudgey Chocolate Brownies {Recipe}
I am so excited to share this delicious LOW FAT chunky fudgey brownie recipe with you! As you can see from the photo, there's no shortage of chocolate in this batch of brownies, nor is there any shortage of flavor!
Thanks to replacing the butter with non-fat Greek yogurt, this decadent treat will satisfy your chocolate-craving naughty little sweet tooth for about half the fat of some butter-filled brownies of the same size. See bottom post for complete nutrition info.
Friday, June 28, 2013
Homemade Sangria Recipe {Warning: Not for Lightweights!}
This Homemade Sangria is great for summer parties and BBQ's - it goes perfectly with sunshine, sitting by the pool, flip flops, fire ants, sunburns, short shorts, and sleeping in.
I'm not kidding when I say this Homemade Sangria isn't for lightweights. Let me tell you from experience: this is a beverage that can knock you on your ass!
Wine AND rum?!? Well, I know it's crazy, but trust me, it tastes delicious. A little too delicious. Consider yourself warned (and please be sure to pass along that warning to whomever you decide to share this tasty beverage with).
Friday, April 26, 2013
Rosemary Orange Biscotti {Recipe}

'Biscotti' is an Italian word, meaning 'cooked twice'. Essentially, biscotti are toasted cookies, usually made in a long flat shape which are perfect for dunking. These flavorful little treats are your morning coffee's soulmates, but don't be afraid to try them to add a little crunch to some vanilla ice cream!
This is an original recipe, adapted from another original recipe of mine - these sweet Rosemary Orange Walnut Cookies that I made for Christmas. They were absolutely delicious... but are made with butter. When I made them, I remember thinking they would make amazing biscotti, and wishing I had made them a little healthier too.
I have been cooking with grapeseed oil for several months now. It is a wonderful oil, with a neutral flavor, lower in monounsaturated fats than olive oil, and more Vitamin E per serving. I'll be honest though, the reason I bought it in the first place was for beauty purposes (I heard it is an excellent moisturizer and helps minimize fine lines around the eyes. More on that another time!). But after running out of olive oil, I began using it in the kitchen as well and enjoy it in homemade salad dressings and stir fries!
I saw that Pompeian - the brand of grapeseed oil I have been using - was having a recipe contest encouraging bloggers to create a recipe using grapeseed oil instead of butter, and I thought it was a perfect opportunity to test my Rosemary Orange Walnut Biscotti recipe!
I think they turned out great...But they sure didn't last long around here. I've already committed to making a double batch next time. I hope you'll like them too :)
UPDATE 05/05/13: This recipe was chosen as a semi-finalist in the Pompeian "Time to Change Your Oil" recipe contest! I would LOVE it if you would vote for me! Public voting ends 5/12.
Tuesday, January 29, 2013
Strawberry Yogurt Hearts - Easy, Sweet, + Lowfat Valentine's Treats!
Friday, December 28, 2012
Rosemary Orange Walnut Cookies: My Very Own Gourmet Recipe
Saturday, December 15, 2012
DIY Lemon Butter Lip & Skin Balm in Altoids Tins

This rich Lemon Butter Balm is amazing and extremely versatile. You can use it as a lip balm, cuticle cream, moisturizer for hands, feet, elbows, knees, body, etc. It is deeply moisturizing and will do wonders for your winter dry skin, and it has a lovely subtle scent, which reminds me of honey lemon tea.
Of course you can play around with the 'flavors' by adding essential oils to the mix. I really only used the lemon extract because I had it on hand and didn't have any lemon essential oil around, which would have made for a stronger scent (you would probably only need several drops instead of 2 tsp of extract).
I poured mine into Altoids tins because I happened to have a giant stash saved up (I used to keep them for jewelry making supplies...back when my stock was small enough to fit in these tiny containers :). Plus I thought they'd be kinda cool and they're the perfect size to stash in your purse!
Wednesday, December 12, 2012
Peppermint Schnapps Hot Cocoa {from scratch} Recipe

What better way to warm yourself right down to the toes this holiday season than with a rich, homemade hot cocoa spiked with Peppermint Schnapps? This tasty winter treat is an adaptation of my Bourbon Hot Chocolate recipe. I know I love chocolate and mint together, so I thought I'd sub the bourbon out for some Peppermint Schnapps and see what I got.
Well? What did I get? Heaven. And here's the recipe!
Tuesday, October 30, 2012
Rich Bourbon Hot Chocolate with Boozy Whipped Cream Stars {Recipe}

I made some delicious Bourbon Fudgesicles this summer, and as I was whipping them up I made a mental note to come back and tweak the recipe for a yummylicious hot chocolate beverage when the weather was right. The recipes are very similar, but the main difference besides the serving temp is that this hot chocolate can have more booze because it doesn't have to freeze (too much alcohol would prevent popsicles from freezing, as the booze lowers the freezing point of the mixture).
This wonderfully rich chocolatey recipe is perfect for a sweet romantic night at home with your honey by the fire on a cold winter night. It is pretty strong, so if you want to switch out some of the bourbon for a bit more water, that would be just fine, depending on your preference.
I would also recommend making the whipped cream first if you want to make the cute little star shapes, since it needs a few hours in the freezer to work. Enjoy!
Sunday, October 21, 2012
Homemade Maple Pumpkin Butter Recipe (with free printable labels)

This delicious homemade Maple Pumpkin Butter is a wonderful autumn treat - thick and spreadable, perfect on toast or apples or bagels, or even ( - if you're not afraid of a pumpkin overload - ) some warm homemade pumpkin scones.
Packaged in these sweet little canning jars and tied with raffia or ribbon, I think this recipe makes a wonderful gift for coworkers or hostesses, on its own or as part of a gift basket full of other goodies!
(I'm including the link below to download the free printable for the labels I made, in case you'd like to use them too!)
Monday, September 10, 2012
Starbucks Inspired Pumpkin Scone Recipe

I don't know about you, but I am just over the moon that it's Pumpkin Spice Latté season again at Starbucks. But both thankfully (for my pocketbook) and unfortunately (for my cravings), we don't have a convenient Starbucks in our neighborhood. I suppose at this time of year that's also good (for my figure) because every time I get a Pumpkin Spice Latté I have to complement it with a delicious Pumpkin Scone.
Not only is it one of my favorite caffeinated beverages, but the arrival of the glorious Pumpkin Spice Latté means that we're on the cusp of fall...therefore nearing the end of triple-digit heat here in Texas...which in turn means that the (self imposed) ban on using the oven has been lifted and I can start baking again...and THAT means that I can bake my own Starbucks inspired Pumpkin Scones!
Well I did. Today. And guess what? Now you can too because I'm sharing the recipe :) Of course, I didn't do a side-by-side taste test or anything, but I swear these are just as good as the pumpkin scones from Starbucks. But I'll let YOU be the judge of that!
Friday, August 3, 2012
Recipe: Peach Bellini Popsicles

I don't know if you've noticed, but I"ve been on an alocholic popsicles binge lately. The word "hot" no longer seems uncomfortable enough to describe this awful feeling like I put on damp hot clothes and can't escape, even inside my own house (where my A/C seems to have given up on this place too). I'm sure walking around naked is an option, but then again...it's really not.
So, my answer to this obnoxious summer heat is to come up with delicious frozen treats that contain just enough happy juice to "take the edge off" the sweltering heat while I pretend I have a beautiful ice cold pool that I can float in anytime I want. Won't you join me??
HOMEMADE PEACH BELLINI POPSICLES
INGREDIENTS:
(Makes 6-8 pops)
• 2 cups sliced peaches (fresh or thawed from frozen)
• 1 cup white wine*
• 1/4 cup orange juice
• Popsicle molds
• Wooden popsicle sticks
DIRECTIONS:
Combine wine, peaches, and orange juice in a blender and process until smooth. Pour the blended mixture into your popsicle molds and place in the freezer for about 1.5 hours uncovered without the sticks or popsicle mold tops.
Insert the wooden popsicle sticks after the pops have had time to set up a little, so you can place them directly in the center and they will stay upright. Allow to freeze 3-4 more hours.
NOTES:
* I used Pinot Grigio, as that's what I had on hand. You could also use champagne, as that's what traditional bellinis are made with, or another sweet non-sparkling white wine such as Riesling if you want a sweeter popsicle. Mine turned out perfectly for my own taste, as the peaches and orange juice add enough sugar to balance the wine well.
I prefer using wooden sticks to the plastic handles that come with the molds I use, because they stick better; the plastic ones tend to come out when you're trying to extract the pops from the molds, or if you're swift enough to manage it otherwise, the popsicles fall off halfway through eating. Not good! You can use cling film to cover the end of each mold so they're not unprotected in the freezer; just wait until they are completely frozen with the sticks in place, then use the stick to poke a hole in the plastic and wrap tight.
More Like This:
Sunday, July 15, 2012
Recipe: Kahlua Banana Popsicles

If you loved my Bourbon Fudgesicles, you'll love these! These popsicles are a sweet grown-up treat with bananas and a hint of coffee; soooo delicious!
INGREDIENTS:
(Makes 6-8 pops)
• 3 large bananas
• 1/4 cup kahlua coffee liqueur
• 1/8 cup heavy whipping cream
• Popsicle molds
• Wooden popsicle sticks
DIRECTIONS:
Combine bananas, kahlua, and cream in a blender and process until smooth. I recommend mashing the bananas down a little bit.Pour the blended mixture into your popsicle molds and place in the freezer for about 2 hours uncovered without the sticks or popsicle mold tops.
Insert the wooden popsicle sticks after the pops have had time to set up a little, so you can place them directly in the center and they will stay upright. Allow to freeze 3-4 more hours.
OPTIONAL GARNISH IDEAS:
Drizzle with chocolate sauce
Sprinkle with (or dip in) grated chocolate
NOTES:I prefer using wooden sticks to the plastic handles that come with the molds I use, because they stick better; the plastic ones tend to come out when you're trying to extract the pops from the molds, or if you're swift enough to manage it otherwise, the popsicles fall off halfway through eating. Not good!
You can use cling film to cover the end of each mold so they're not unprotected in the freezer; just wait until they are completely frozen with the sticks in place, then use the stick to poke a hole in the plastic and wrap tight.

More Like This:
Friday, July 6, 2012
How to Roast Garlic

Garlic is a staple in my cooking. I am not exaggerating when I say that almost every single thing I cook starts with sautéed onions and garlic, but luckily, it is a healthy addiction!
Roasting garlic is really easy, and the result is a delicious addition to almost any dish. It's great in sauces, with pasta, in soups or salads, and my favorite is garlic bread - mash up a roasted clove on a piece of french bread, sprinkle with a little salt and pepper and parmesan cheese, and toast it in the oven for a few minutes. (Come back and thank me later :) If you prefer a more subtle taste, simple rub a clove of roasted garlic over the surface of some freshly toasted bread.
For the longest time I thought you had to have one of those fancy clay garlic roasters to make your own good roasted garlic, but that's not true at all! I'm going to show you the way I make it.
INGREDIENTS:
• 3 bulbs of garlic
• 2-3 TBSP extra virgin olive oil
• 1/8 tsp each salt and pepper (optional)
• aluminum foil
INSTRUCTIONS:
Preheat your oven to 350˚.
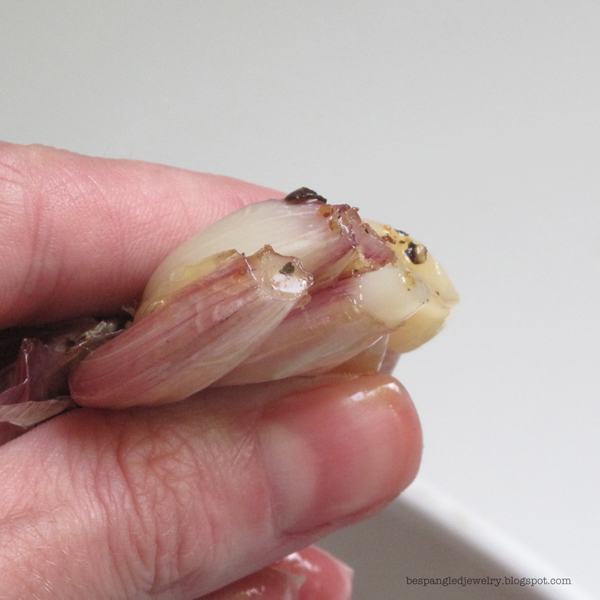
Start preparing the garlic by peeling off the outside layers of paper. You'll know when to stop when you can see the individual cloves. You can leave the rest of the skin on, as in photo below, and it will come off very easily after roasting.
With a very sharp knife, slice off the top of the bulb to expose the tops of the individual cloves. Also cut off the 'butt' of the garlic to do the same on the other side.
Place the prepared garlic bulbs in a small baking dish or on top of a piece of foil on a baking sheet. Drizzle evenly with olive oil and sprinkle with salt and pepper. It's ok if some of the cloves get separated from the bulb.
If you are using a baking dish, cover it with foil. If you are using a sheet of foil on top of a baking sheet, wrap the foil around the garlic to cover completely and form a nice little parcel to contain the oil as it cooks.
Place it in the oven and bake for 25-30 minutes. Garlic should be soft when finished; test with a fork.
After the garlic cools enough to touch, you can squeeze the cloves out of the skin easily or peel them by hand.
NOTES:
You can use any leftover olive oil for cooking, or store it in the fridge in a tightly sealed container along with your roasted garlic.
Try adding other herbs and spices into the mix, like fresh rosemary or thyme. Dried herbs work well too.
Use this garlic in recipes that call for fresh garlic and see what difference it makes! What fabulous recipes will you try with your delicious home-roasted garlic?
Friday, June 29, 2012
Recipe: Delicious Bourbon Fudgsicles (grown-ups only!)

(Makes 6-8 pops)
• 1/2 cup granulated sugar
• 3.5 oz bittersweet chocolate (70-72%), chopped
• 2 TBS dutch-processed cocoa powder*
• 1/8 tsp salt
• 2 TBS bourbon* (see below for non-alcoholic suggestion)
• Popsicle molds
• Wooden popsicle sticks
![]() |
| A glorious pile of chopped dark bittersweet baking chocolate! |
Combine sugar, chocolate, cocoa powder, and salt in a saucepan with 2 cups of water. Warm over medium heat and whisk constantly until mixture just begins to boil. Remove from heat.
Transfer to a 4 cup glass measure or a bowl with a spout and leave at room temperature to cool for 30 minutes.
Stir in the 2 tablespoons of bourbon then pour into pop molds. Place in freezer and leave for about 3 hours without tops, then add the popsicle sticks and return to freezer for at least 4 more hours.
NOTES:
I used a set of these Tovolo Star Popsicle molds and got 6 pops plus a little extra that made for some damn good hot chocolate :) These molds have their own tops, but I really prefer to use wooden popsicle sticks because they are longer and the pops stick to the wood better than the plastic (so, fewer instances of the stick coming out of the mold before the popsicle). If you want to cover the ends of the pops while they're in the freezer, use some plastic cling film over each one after they're frozen solid; just use the sticks to poke a hole in the plastic wrap.
*Dutch-Processed cocoa powder is an unsweetened cocoa that has been alkalized to neutralize the acid. It has a more delicate flavor than the other kind of unsweetened cocoa powder, referred to as Natural cocoa powder which has an intense flavor and tastes quite bitter. Lindt is a popular example of Dutch-Processed cocoa, while Ghirardelli is a well-known Natural cocoa powder.
If you'd like to make a non-alcoholic version, leave out the bourbon and try adding a splash of vanilla extract (about 1/2 tsp).
Wednesday, February 15, 2012
Decadent White Chocolate Martini Recipe: Happy Valentine's Day!
Ingredients:
1.5 oz Stoli Vanilla Vodka
1 oz Godiva White Chocolate Liqueur
Chocolate Covered Strawberry for Garnish
shaken in a cocktail shaker with ice and strained into a decorated martini glass
(instructions below)
My sweetheart asked me if I would help him make a bunch of chocolate covered strawberries on Monday, for work. Of course, I said yes, but I was too curious to not ask what they were for. I guess I was a little surprised when he said they were for garnish on a special Valentine's Day cocktail at the restaurant!
Why the heck did I never think of that before?? What a brilliant idea! So I forced him to tell me what was in this special Valentiney drink besides an oversized decadently dipped garnish. He listed off about 5 ingredients, which to me is usually too many. With cocktails, I say the simpler the better. I love interesting and different combinations, like cucumber and tequila or anything crazy like that, but most of the time if there's a bunch of stuff in it it never seems quite right. (Plus...I don't normally keep a fully stocked dream bar at all times...do you?)
So, I decided we could simplify the recipe and still make a delicious drink, because despite never having been a bartender, I can still impress people with my mixological prowess, and do so often. (And if 'mixological' wasn't a word before, it is now!) Instead of the strawberry purée, creme de cacao dark, half & half, Stoli Vanilla and Godiva White Chocolate concoction that the restaurant was serving, we thought we'd give it a shot with the vanilla vodka, Godiva, and strawberry purée. It tasted funny (but I still drank most of it, don't worry).
By this point, we're about halfway through the strawberry dipping process (and a little more than half-buzzed, whoops!), and I got the brilliant idea to use the chocolate candy coating to decorate the inside of the martini glass (directions below), and just go for a simple white chocolate cocktail. It was perfectly delicious!
So, this recipe is the final version we decided was a keeper: about 1.5 ounces of Stoli Vanilla Vodka, 1 ounce of Godiva White Chocolate Liqueur, shaken over ice and strained into the decorated martini glass!
Before you get started, lay out some wax paper on the countertop or on cookie sheets to lay the dipped berries on to set.I use Make 'N Mold Dark Chocolate Wafers and the White Chocolate version for the drizzle. Of course, vice versa is great too!
A couple of tips:Make sure you wash the strawberries, but pat them dry completely before you start dipping. Water causes the chocolate candy coating to separate and it looks terrible and won't set smoothly, so beware of reaching over the bowl with dripping wet hands as well.
I use a tall thin microwave safe container, so I don't have to use so many chips at once for chocolate deep enough to be able to dip the strawberries completely into in one smooth motion. A wider bowl means wasted chocolate!
Follow the directions for melting the candy chips; 30 seconds on half power or defrost setting at a time, always shaking or stirring the chips before putting them back in the microwave. Repeat as necessary until your chocolate is smooth when stirred.
A tiny amount of vegetable or canola oil mixed in to the melted chocolate will give it a slightly runnier consistency, which especially helps when you use the chocolate in a squeeze bottle for decorating. The exact amount obviously depends how many chips you are melting at a time, but trust me start very small with barely 1/8th of a teaspoon and add more in small amounts as needed.
Hold the dry clean strawberry by the leaves and dip straight down into the melted chocolate, and back out again. Set each dipped berry on the waxed paper and don't touch them for several minutes!
Keep dipping until all your strawberries are covered, reheating the chocolate or adding more chips as necessary along the way.
Decorating your Strawberries and Martini Glass
If you want to decorate with a white chocolate drizzle, it's good to have a microwave safe plastic squeeze bottle with a small tip. (I bought these from Amazon: Wilton Set of 2 6-Ounce Mini Melting Decorating Squeeze Bottles).
Melt the chips in the bottle with the lid off, using a chopstick or long spoon to stir inside the bottle. I usually only fill mine up about 1/3 at a time. You can always add more chips if you need more!
Again, the vegetable or canola oil trick works well here, you can make this drizzling chocolate a tiny bit more runny so you can use a bit more oil. You don't want the mixture sputtering out like an old empty bottle of mustard!
If you don't have the perfect squeeze bottle, you can always melt the chips in any microwave safe container and transfer carefully to a ziploc bag. Twist the top and snip a tiny bit off one corner with scissors and you've got a makeshift candy decorating squeeze bag!
As long as your dipped strawberries have set completely, you can start drizzling your contrasting chocolate across the top. The higher you hold the bottle, the cleaner your lines will be, provided you zigzag quite quickly. Obviously it doesn't have to be perfect, just have fun and you'll figure it out!
For your martini glass, make sure the glass is clean and dry, and drizzle the melted chocolate all around the inside of the glass. I made a swirly loopy pattern that kind of looked like hearts!
Allow the chocolate to set in the glass for a minute or two, then you're ready to shake and strain your delicious Decadent White Chocolate Martini into it!
Grab one of your beautifully dipped and decorated chocolate covered strawberries and cut a diagonal slit in the bottom. Slide it on to the side of the glass, and enjoy!
Happy Valentine's Day!
Subscribe to:
Posts (Atom)