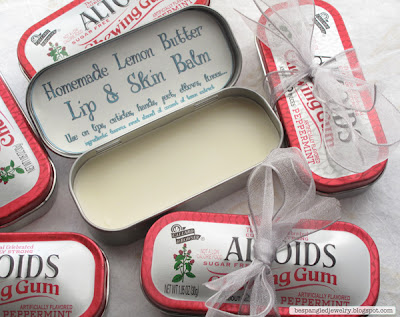
This rich Lemon Butter Balm is amazing and extremely versatile. You can use it as a lip balm, cuticle cream, moisturizer for hands, feet, elbows, knees, body, etc. It is deeply moisturizing and will do wonders for your winter dry skin, and it has a lovely subtle scent, which reminds me of honey lemon tea.
Of course you can play around with the 'flavors' by adding essential oils to the mix. I really only used the lemon extract because I had it on hand and didn't have any lemon essential oil around, which would have made for a stronger scent (you would probably only need several drops instead of 2 tsp of extract).
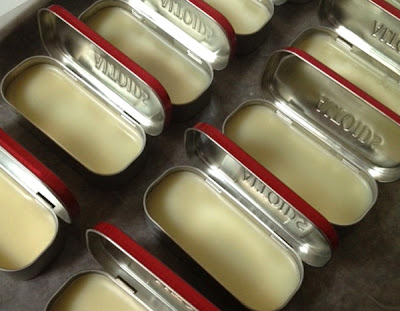
I poured mine into Altoids tins because I happened to have a giant stash saved up (I used to keep them for jewelry making supplies...back when my stock was small enough to fit in these tiny containers :). Plus I thought they'd be kinda cool and they're the perfect size to stash in your purse!
You can use any kind of container you want. Old beauty product jars work great, of course. You can even fill empty old chapstick tubes if you have the dexterity to do so!
If you'd rather buy new containers or tins, there are plenty of options available at Amazon, and the same goes for the ingredients below if you can't find them in your grocery store.
Are y'all ready?? Let's make some Lemon Butter Balm!!
INGREDIENTS:
fills about 12 small altoid tins
1/3 cup beeswax
1/3 cup sweet almond oil
1/3 cup coconut oil
2 tsp pure lemon extract
DIRECTIONS:
Make sure you clean your containers well with soap and water. *They must be completely dry before you pour the mixture in. Have a tray or baking sheet covered with wax paper ready with all your containers place on it, in a spot where they can stay untouched until completely set.
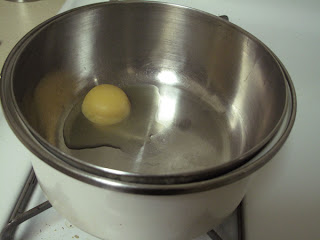
Begin by melting the beeswax in a double boiler over medium heat. If you don't have a double boiler, you can use a metal or heat-proof glass mixing bowl on top of a regular saucepan >>> with about an inch of water in it, as long as the bottom of the bowl doesn't touch the water in the pan.
When the beeswax has melted completely, add the almond oil. It will turn white when it hits the hot beeswax, but as it heats up it will become clear. At this point, add the coconut oil. Same thing here - allow the coconut oil to melt completely and as soon as the oil mixture is completely clear, remove the pan from the heat.
Immediately add the lemon extract and stir briefly.
Use a ladle with a pouring lip to pour the hot mixture into your containers. If using Altoids tins, fill to just below where the holes for the lid hinge are.
Leave at room temperature to cool and set up - at least 1 hour. It may need to be longer for deeper containers. Try not to move the tray and do NOT touch the surface while they are cooling or you'll mess up that beautiful smooth surface.
Clean up any drips after the mixture sets by scraping with your fingernail. You can then wipe the greasy residue off with a paper towel.
I made labels to fit the inside of the lid by tracing the bottom of the Altoids tin and scanning that in to Photoshop as a size guide. I created a new layer to match the shape (and to hide my ugly pen lines) and put a 2 pixel stroke (outline) around it as a guide for cutting. I printed them out on a full sheet label page and cut them out with scissors.

Wouldn't these make great stocking stuffers or gifts for coworkers?
If you try this recipe and add your own twist or find other cool containers to put them in, I'd love to hear about it in the comments!


I have the beeswax, coconut oil and essential oils but not the almond oil. Is there anything else I can sub for it? Would grapeseed oil work at all? Or anything else household you would suggest? Thanks!
ReplyDeleteHi Jill!
ReplyDeleteYes, grapeseed oil would be perfect, or I think you could even double up on the coconut oil. As long as you stick to the ratio of 1 part beeswax to 2 parts oil, you can play around with the recipe quite a bit.
Don't forget when using essential oils you'll use much less than the extract. I'd say follow your nose - add a few drops at a time until you are happy with the scent.
Have fun! I'd love to hear how your version turns out!
~ Jessica
Great, thanks so much for the input! I just got my lip balm tubes from Amazon yesterday so I'm anxious to whip up a batch possibly today. I'm not a lemon fan so my essential oil is orange and since I'm a big baker I have lots of extracts that I could probably play around with too. I will definitely let you know how it turns out!
ReplyDeleteThanks for sharing..thai will make a perfect gift for co workers.
ReplyDeleteAwesome blog! I'm following you and gave you a shout out!
ReplyDeletehttp://4you-withlove.blogspot.com/2012/12/26-random-acts-of-kindness-blogger-style.html
Have a great day!
Marilyn
Thanks Marilyn! I appreciate the shout out :)
DeleteThis looks awesome! I'm pinning it for later for when I can actually find the time to try this.
ReplyDeleteWhat a great idea. I have made butters, soaps etc with my kids when they were in their teens. so much better than store bought. Great job, oh, and the lemon scent sounds so refreshing. I found your blog thru a link u from 4youwithlove blog, where you and I were featured. I thought she had a really fantastic idea, so I am making it a point to visit those blogs she featured and pay it forward by following them. Merry Christmas
ReplyDeleteThank you Tammy! I'll be doing that today also - I'm a huge fan of paying it forward and I loved the idea too.
DeleteI agree that homemade is so much better than store bought, for so many things and for so many reasons!!
Merry Christmas to you too :)
You have some wonderful DIY projects. I found you on 4youwithlove where I was featured also. I am paying it forward and following all the blogs also. Happy Holidays. I have always wanted to make these tins but--where do you get all these tins? You must like Altoids!
ReplyDeleteThanks Donna! I'm working my way through all the features as well :)
DeleteMy mom actually saved a bunch of these for me to keep beads and jewelry supplies in, but my stash has outgrown the little space they provide. I obviously save them for myself too - yes I love Altoids, lol!! You can also buy empty blank tins online but I love to recycle!
Happy Holidays!
Great tutorial...I've always wanted to make my own lip balm. Great use of the Altoid tins too! I found you on 4youwithlove where I was featured too.
ReplyDeleteThis is a really great idea. I will definitely pin this so I can try it later. I found you on 4youwithlove where I was also featured. Happy Holidays!
ReplyDeleteWhat can I use instead of coconut? We cant use that in our house
ReplyDeleteHi Julie!
DeleteI have never tried subbing out the coconut oil, but I *believe* you could double up on the almond oil OR use something else like grapeseed oil or even olive oil (if you don't mind the scent). My understanding is that as long as you keep the ratio of 1 part beeswax to 2 parts oil, the oil can be almost anything.
You can always try a very tiny batch to see how it works - 1 Tablespoon of beeswax + 2 Tablespoons other oil(s) + a drop of essential oil or a splash of extract.
I hope that was somewhat helpful... I do plan to experiment more with different oils in the next batch, but I'd love to hear how it works out for you!
Thanks for stopping by :)
Thanks I will give it a try!
ReplyDeleteWith the ratio you have listed above does it make the balm more solid? I looking for a version that is more chap stick thickness vs a lip gloss consistency like Vaseline. Also do you know how these hold up in the warm weather? I realize any chap stick or lip balm will melt if it's too hot. I'd like to make some of these up and mail them out to family come summer time so I'm trying to find a recipe that will hold up in shipping :)
ReplyDeleteThanks
Hi Lisa!
DeleteYes, this recipe makes a very solid balm - the consistency of chapstick. However, I'm not sure about shipping in the summer - that's sort of a tough call. I do know it melts at body temp (98 - 99˚)- like lotion bars do, when you rub them on your skin. I would be a bit nervous about shipping if there was a possibility of it sitting in a hot mailbox in direct sunlight for hours on end (especially here in Texas!)
I will ask a couple of friends who make and sell things like this on Etsy to see if they have any insight or suggestions.
Thanks so much for stopping by. Have fun!!
~ Jessica
Okay thanks! I often wonder how those ebay / etsy shops handle shipping their products so I appreciate you taking the time to ask the question. I'm excited to make some of these up and am on the hunt for some "cute" containers. I will post again when I find something fun!
ReplyDeleteThose tins are absolutely adorable, I really love your way of packaging and labeling. =)
ReplyDeleteI just made these and I'm (sadly) very disappointed! they are very waxy and not moisturizing at all! I did all of the same things you did, used the same amounts and everything but they are just very dry and waxy.
ReplyDeleteDid you have any of the same issues or do you have any suggestions?
Amy, I'm so sorry to hear that! I didn't have any issues at all. Mine is slightly waxy (due to the beeswax, of course) but it's still very moisturizing - the consistency and texture is like a good chapstick, so perhaps that's not what you were expecting. It really shouldn't seem dry, when it's 2/3 oil!!
DeleteIf you're not happy with the mixture, I'd suggest playing around with the ratio of beeswax to oil. So you don't have to waste the ingredients, you should be able to melt down what you already made (though I haven't tried it so I could be wrong :/ ) by submerging the containers in warm or hot water until they become slightly liquid. Then pour them back into your double boiler and melt it slowly, and just add a bit more oil to your mixture. Mix well and test it by putting a small amount aside to set and see if you like it better. Keep notes on how much oil you added so that when you find the ratio you like, you'll be able to repeat it next time!
If you'd rather just start over, I'd suggest trying just a very small amount of your ingredients. Say, 1 TBS of each oil to maybe 3/4 TBS of beeswax. If you like that mixture, you can easily convert the recipe to a larger quantity by sticking with the ratio of 1:1:3/4 ( whether it's in cups or gallons, etc.)
I hope that will help you come up with a recipe you enjoy! Let me know if it works better for you that way. Thanks so much for stopping by!
Hi my dear, what a wonderful blog!!! I'm a new followers and I'm really happy to be it!!!
ReplyDeleteWhere can i get these oils from. And can i use other oils other then Almond oil.
ReplyDeleteI'm a young adult librarian in Wisconsin and we used this idea as a teen craft project. It was a Huge Huge hit. Any thoughts on the best way to clean my supplies? All purpose spray for the tables? Soap and water for the ladles and bowls and spoons?
ReplyDeleteHi Kristin,
DeleteThat's so great to hear - I'm glad it was a hit!
Unfortunately, the clean up is the worst part. For the bowls and spoons, hot soapy water for sure, and for the tables I might try the same. All purpose spray would be a good follow-up once you get the main gunk off with the hot water and soap. Of course, if there are any waxy lumps, you can scrape them off first.
Thanks for sharing this project with the kids. I bet they had tons of fun :)
I have liquid coconut oil will it still work or do I need to go get solid coconut oil?
ReplyDeleteHi Kylie! Yes, that will work! Actually, coconut oil is liquid in temps above 76˚F so it's the same stuff. Thanks for visiting - hope you enjoy making this!
Delete