Showing posts with label arts and crafts. Show all posts

Monday, February 11, 2013

How to Draw a Heart Without a Template {Tutorial}

how to draw a heart without a template - tutorialI realized suddenly at the beginning of a project how spoiled I have been by the ease of finding templates online for any shape I could ever need to make. Just print and trace or cut out...without ever giving it a second thought. Hearts are particularly easy - I can just use the heart shape tool in Photoshop and stretch or squash the heart to the right dimension and enlarge or reduce the size until it's just what I need, and print it out.

However, what happens when I need a HUGE shape - too big to print out? Hmmm, do I trust myself to be able to draw a perfectly symmetrical heart on a piece of posterboard? Uh...no.  So I came up with a plan.


Here's how to draw a symmetrical heart without a heart-shaped template to trace!

Wednesday, August 29, 2012

DIY Grocery and "Honeydew" List Fridge Magnets

DIY grocery and "honeydew" list holder Fridge Magnet with popsicle sticks and mini clothespins (tutorial)


Are you ready for another fun tutorial? Let me show you how I made these cute "Honeydew List" or grocery list holder fridge magnets from popsicle sticks and baby clothespins!

Thursday, June 28, 2012

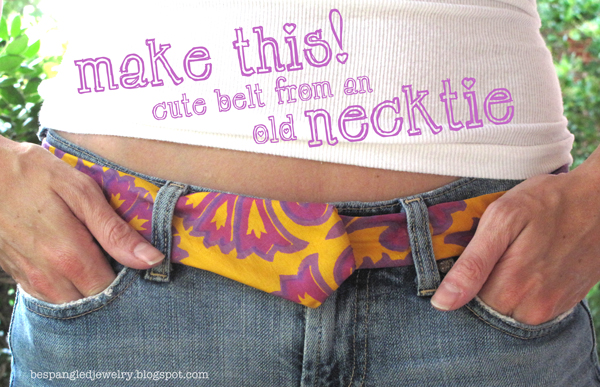
How To Make a Cute Belt from an Old Necktie!

Make a cute belt from an old necktie


This is my second project using the same tie; see how to make an iPhone or iPod pouch case from an old necktie if you want to see another fun tutorial!

SUPPLIES and TOOLS:
• 1 necktie
• marker
 rotary cutter or sharp fabric scissors
• ruler / straight edge
• cutting mat
• needle and thread
hook and eye closures


First, wrap the tie around your waist at the point you want to wear the belt. I actually tried mine on with my favorite pair of jeans to see exactly how long it would need to be to wear with those, figuring that would be the lowest I would wear it and therefore the longest measurement. I measured mine to overlap by about 6 inches at this longest length; I planned to place the hook 1" from the large end and the first eye 4" from the small end, plus I gave myself another inch to sew the end into a point.


So, mark your tie to cut where you like how much it overlaps and remember to give yourself an extra inch at least for finishing the cut end.

Step 1: measure your waist and cut the tie

Using a ruler and this Rotary Cutter on a cutting board, I cut off the extra fabric in a nice straight line, and set the extra piece aside for another project (that I'll share with you later!)

Step 2: Fold back the outer layer of fabric and cut the lining into a point

Now, fold back the outer layer of fabric about 1.5" and snip any stitches that are connecting it to the lining inside. Cut the lining into a nice point, using the other end of the tie as a guide for the angle if you like. I used sharp fabric scissors here.

Step 2: Fold back the outer layer of fabric and cut the lining into a point

Unfold the outer layer of fabric and make sure you have a nice amount overlapping the point so you can fold it in and cover all the lining.

Step 3: Cut the outer layer of fabric to remove excess

Working with the seam facing upward, cut the top part of the fabric into a point as shown above, keeping the same amount of fabric overlapping as before. That is to say, the lining and the outer layer follow the same angle but the lining is about an inch shorter than the outer layer.

I made some strange cuts (above) to the bottom of the fabric, just to get rid of some extra that would make it too bulky when tucked inside. This part is optional if you can manage to tuck the ends all in nicely without making it lumpy. 

Step 4: Tuck fabric inside itself and stitch in place


Still working with the seam upward, tuck the top pointed ends of the outer fabric inside the end of the tie, staying on top of the lining layer.  The bottom layer comes up and over the lining and tucks inside as well. We are trying to mimic the finished end of the tie as much as possible (above).  Use a pencil to help you tuck all the fabric as far in as it will go and as flat as you can make it.

With the needle and thread, stitch the ends into place without passing the needle all the way through to the other side of the tie, as this will be the front of the belt. You do want the thread to pass through part of the lining to hold it in place inside the silk.

I'm sure if you have even 2 minutes more experience sewing than me that you can do a much better job. I'm obviously a little out of my element here, but I do take great comfort in the fact that this is the underside of the belt that won't be exposed to critical eyes for the most part :)


Step 5: Sew hook to the large end of the tie belt

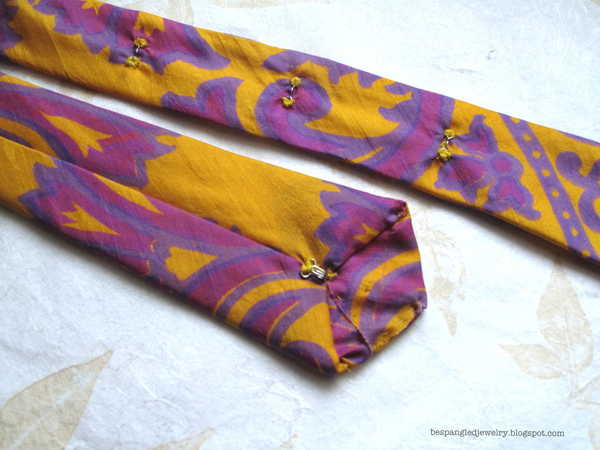
Now you're ready to sew the hook on to the underside of the end we just finished. I placed mine just below the V where all the fabric comes together; about an inch from the pointed tip.


Step 6: Sew bars to the length of the belt to complete the closure

Now that the hook is in place, wrap the belt around your waist again at the largest part you may ever want to wear it and use the marker to make a small dot on the top of the small end where the first eye will go. 

If you want to add more eyes to make a variable length belt, you can go ahead and mark those now too. I made my belt with three; one to fit my jeans around my hips, one to fit my actual waist at my belly button, and then one halfway between those, just for the heck of it. You can use as many or as few as you like.

Sew the eyes (or bars, as mine are) into place where you made your marks, and when you're done...you're done! Try on your awesomely adorable new belt and wear it proudly!

I'd love to see your tie belt if you make one like this - feel free to leave a link to your post in the comments here, and of course, I would appreciate a link back to this tutorial if you do use this post as inspiration for a project :)


This is the belt at the shortest length, around my waist. I think this would be so cute with a nice long summery white dress (that I don't have, of course...)


And with my favorite low-rise jeans!


MORE NECKTIE CRAFT PROJECTS (using the rest of this very same tie!) :


DIY: How to make a pretty pouch for your iPhone or iPod with an old necktie


I LOVE to be pinned on Pinterest :)  I hope you'll share with the world by pinning me if you like what you see here! 


Green Crafts Showcase

Wednesday, June 27, 2012

Necktie DIY: iPhone or iPod Pouch Tutorial


I've been having so much fun upcycling things lately. 'Re-fashioning' is very appealing to me; not only because it gives outdated things a new life, but because it lets me use my creative problem-solving skills and create something one of a kind! This is my entry for this month's Etsy Fort Worth Upcycle THIS! Craft Challenge. I will show you step by step how I made an iPhone pouch from one of my Dad's old (and I mean oooooold) ties!


As you can see, this tie is a lovely handpainted silk pattern in bright gold and various shades of lilac. Very Retro. Beautiful fabric, but a little garish to be worn as an actual necktie these days, don't you think? I thought it would make a beautiful little fold-over pouch, and I was right!

For DIY, keep reading & let's get started!

SUPPLIES and TOOLS:
• 1 necktie
rotary cutter or sharp fabric scissors
• ruler / straight edge
• cutting mat
• needle and thread
decorative snap buttons
snap fastener or snap fastening pliers


First, fold over the pointed end of the tie and measure from the straight edge that creates. I used a sharpie to mark at 6 and 1/2 inches, because that was a good size to fit my iPhone. If you are creating a pouch for another specific object, measure by sliding it inside the end of the tie, and fold over the flap as if you were closing the pouch. You want to make sure you leave yourself room for the seam at the bottom, so find the end of your object inside the tie and add at least 1/2", then mark for cutting.


I used a ruler and this awesome Fiskars rotary cutter on a cutting board to create a perfect straight cut. You can also use very sharp fabric scissors, of course. (Save the remainder of the fabric; I have some more fun Upcycled Neck Tie project ideas for you!!)


Turn your cut piece inside out. I left the lining of the tie in place, so I didn't have to re-stitch the seam. Plus, I thought it would be great to have that extra padding.


Stitch a straight line to close the end of the pouch, about 1/2" from the end of the fabric. I folded the corners in and sewed them down to create rounded corners for the pouch.  I trimmed the excess fabric using the ruler and rotary cutters again, and then turned the pouch right-side out again.


Using a faux pearl snap and these Dritz snap fastening pliers, I secured the bottom of the snap in place throught the fabric, about 1/4" down from the V of the pouch opening. Refer to your snap package for clear directions on assembling the pieces correctly.  The top of the snap has a different back piece than the bottom part of the snap.


I repeated the process for the top part of the snap, after rotating the bottom part of the jaw on the snap-fastening pliers. Refer to instructions from your particular fastening tool or pliers, and be sure to add the rubber rings to the jaws of the snap fasteners if they are included but not attached already.


That's it! It was super easy, even for someone like me who doesn't sew!


Want to buy the finished pouch? It's a one-of-a-kind piece, for sure. You can get it here(sold!)

I'd love to see your projects, please feel free to leave links to your own necktie-pouch creations in the comments below, and of course I would appreciate a link back to this tutorial if it has inspired you to post one of your own :)

Come back tomorrow for another Fun Craft Project - I'll show you how to make an adorable belt from an old necktie (using the rest of this very same tie)!

how to make a cute belt from an upcycled old necktie


I LOVE to be pinned on Pinterest :)  I hope you'll share with the world by pinning me if you like what you see here! 

Green Crafts Showcase
Visit thecsiproject.com

Tuesday, June 26, 2012

10 Fabulous Fun Fourth of July Craft Ideas!

10 fabulous fun 4th of july craft ideas!
I can't believe that July is just around the corner! To be honest though, it wouldn't really bother me if the summer flies by... after all my life in Texas, it still surprises me how hot it gets and somehow I'm never ready for the heat. I swear each year it's hotter than the last, and I know that the existence of global warming is a highly debated issue, but when you're already over 100Âş, trust me when I say that every half a degree increase counts. 

Anyway, enough blabbing about the weather; if I choose to live in Texas I probably shouldn't complain about the heat, right?

With Independence Day only a week away, I thought I'd do a nifty little 4th of July Craft Roundup for you to get your creative fireworks a-poppin'!  Here are 10 fun Red, White, and Blue craft tutorials for you to explore. Click on any photo or caption to be taken to the site where you'll find all the step-by-step instructions for each project. Enjoy!


4th of July tin can luminaries by www.crafts-for-all-seasons.com 

Happy Fourth of July, Everyone!


Feeling inspired by Independence Day? Try my fun DIY Stars & Stripes Patriotic Manicure!

I linked up at:

Wednesday, May 30, 2012

Upcycled Wine Corks; Make Your Own Adorable Handcarved Stamps!

Tutorial: How to make your own handcarved stamps from upcycled wine corks


This month's Etsy Fort Worth Upcycle THIS! Craft Challenge object is wine corks. I've had these corks sitting on my craft desk for weeks, waiting for inspiration (and, let's be honest, to remind me about the impending deadline).

I had a few ideas, but nothing that really motivated me enough to actually get started on the project...until the other night, when I was working on a painting. I got the feeling that I was almost finished, but not quite; it just needed a little something else, some finishing touches. Then I thought it would be perfect if I could paint some lovely flowers all around the edges...but that seemed like it would take me hours to do. And well, I was feeling lazy.

So, naturally, I tried to think of a crafty little short cut, and the first thing that came to mind was to try and find a flower shaped stamp at a craft store...but since it was already 11pm and I wanted to finish the painting, that wasn't really an option. Glancing over at my desk and seeing the corks, it hit me! Carve a little flower in the end of one of the corks, dip in paint, stamp, repeat, and voilĂ !  The idea was born.


It was super easy!  I sketched a rough outline on the end of the cork with a sharpie, and used an X-acto craft knife to cut around the shape. I pressed it into the gold acrylic paint I was using, and used it like a stamp. This cork above was actually made of fake cork, from a bottle of Cupcake chardonnay (yum, and who the heck wouldn't try a wine called Cupcake??) and it worked great!

I loved the idea, and - don't judge me - I had plenty of other wine corks, so I decided to try something a little more complicated, like a word.  Now, don't forget, if you want to stamp a word, you have to carve the letters backwards. Yes, I made this mistake the first time. D'oh! :/


This time, I tried real the corks made with real cork, and they worked just as well!


Sadly, upon carving the 'O' I lost the heart inside of it to an unfortunate accident. Luckily, my supply of wine corks had still not been dented in the least by this project, so I was able to carve another little heart on its very own stamp.


I  LVE the way they turned out! This was such a quick and easy project; I don't think it took more than 20 minutes.  I had so much fun, I kept going :)


Here's how you can make some hand-carved stamps of your own using recycled wine corks!


~Choose the end of the cork with the smoothest texture, probably the end that was inside the wine bottle.  

~Draw a design using a marker, and remember that it's best not to be too intricate or have too many thin areas, for best results. 

~Using an X-acto or craft knife (- be sure that you use a very sharp blade -) cut around the edges of your pattern, using the tip of the blade and pushing straight down into the cork, about 1/4" deep. Instead of using a sawing motion, press the blade down and pull it straight up for each cut, and use lots of little straight cuts like this for curves instead of trying to make one long curved cut.

~Lay the cork on its side and cut around the circumference about 1/8" to 1/4" down from the end you carved, and about 1/4" deep so that all the cuts you made from the top will be cut free. Gently pull off the cut pieces of cork from the top, and go back and refine your design where needed.

~Use paint (I used acrylic) or an inked stamping pad in the color of your choice, and you're ready to get stampin'!

~Don't have a filthy wine-drinkin' cork-savin' habit like me?  Take one cork and cut it into three equal pieces, about 1/2 inch each.  You can cut about 1/4" inch deep and still have a 1/4" base, and now you have 3 times the number of stamps!!!

Please feel free to link up to your own posts or projects in the comments if you use this technique, and I'd certainly appreciate a link back on your own blog as well if you are inspired by this post ♥

I LOVE to be pinned on Pinterest :)  I hope you'll share with the world by pinning me if you like what you see here! 

Photobucket
Green Crafts Showcase