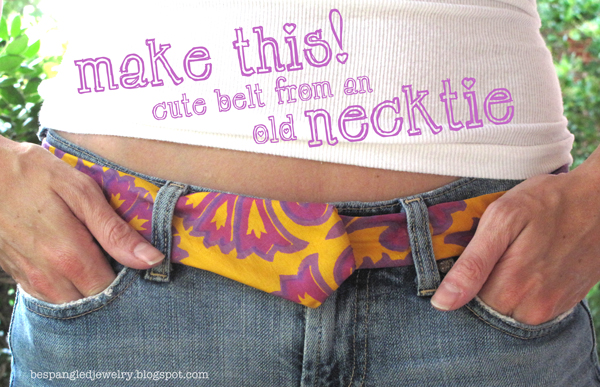
This is my second project using the same tie; see how to make an iPhone or iPod pouch case from an old necktie if you want to see another fun tutorial!
SUPPLIES and TOOLS:
• 1 necktie
• marker
• rotary cutter or sharp fabric scissors
• ruler / straight edge
• cutting mat
• needle and thread
• hook and eye closures
First, wrap the tie around your waist at the point you want to wear the belt. I actually tried mine on with my favorite pair of jeans to see exactly how long it would need to be to wear with those, figuring that would be the lowest I would wear it and therefore the longest measurement. I measured mine to overlap by about 6 inches at this longest length; I planned to place the hook 1" from the large end and the first eye 4" from the small end, plus I gave myself another inch to sew the end into a point.
So, mark your tie to cut where you like how much it overlaps and remember to give yourself an extra inch at least for finishing the cut end.

Using a ruler and this Rotary Cutter on a cutting board, I cut off the extra fabric in a nice straight line, and set the extra piece aside for another project (that I'll share with you later!)

Now, fold back the outer layer of fabric about 1.5" and snip any stitches that are connecting it to the lining inside. Cut the lining into a nice point, using the other end of the tie as a guide for the angle if you like. I used sharp fabric scissors here.
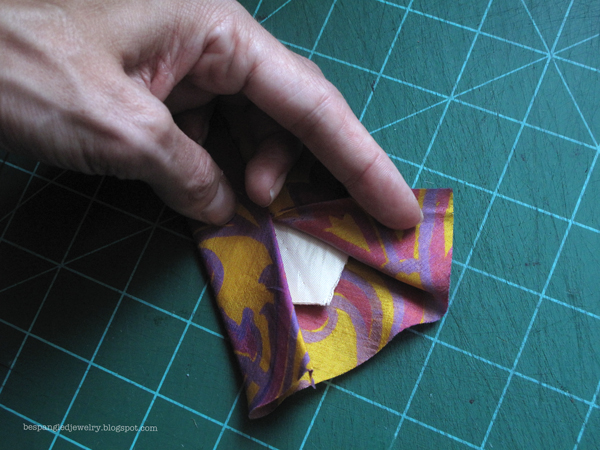
Unfold the outer layer of fabric and make sure you have a nice amount overlapping the point so you can fold it in and cover all the lining.

Working with the seam facing upward, cut the top part of the fabric into a point as shown above, keeping the same amount of fabric overlapping as before. That is to say, the lining and the outer layer follow the same angle but the lining is about an inch shorter than the outer layer.
I made some strange cuts (above) to the bottom of the fabric, just to get rid of some extra that would make it too bulky when tucked inside. This part is optional if you can manage to tuck the ends all in nicely without making it lumpy.

Still working with the seam upward, tuck the top pointed ends of the outer fabric inside the end of the tie, staying on top of the lining layer. The bottom layer comes up and over the lining and tucks inside as well. We are trying to mimic the finished end of the tie as much as possible (above). Use a pencil to help you tuck all the fabric as far in as it will go and as flat as you can make it.
With the needle and thread, stitch the ends into place without passing the needle all the way through to the other side of the tie, as this will be the front of the belt. You do want the thread to pass through part of the lining to hold it in place inside the silk.
I'm sure if you have even 2 minutes more experience sewing than me that you can do a much better job. I'm obviously a little out of my element here, but I do take great comfort in the fact that this is the underside of the belt that won't be exposed to critical eyes for the most part :)

Now you're ready to sew the hook on to the underside of the end we just finished. I placed mine just below the V where all the fabric comes together; about an inch from the pointed tip.

Now that the hook is in place, wrap the belt around your waist again at the largest part you may ever want to wear it and use the marker to make a small dot on the top of the small end where the first eye will go.
If you want to add more eyes to make a variable length belt, you can go ahead and mark those now too. I made my belt with three; one to fit my jeans around my hips, one to fit my actual waist at my belly button, and then one halfway between those, just for the heck of it. You can use as many or as few as you like.
Sew the eyes (or bars, as mine are) into place where you made your marks, and when you're done...you're done! Try on your awesomely adorable new belt and wear it proudly!
I'd love to see your tie belt if you make one like this - feel free to leave a link to your post in the comments here, and of course, I would appreciate a link back to this tutorial if you do use this post as inspiration for a project :)

This is the belt at the shortest length, around my waist. I think this would be so cute with a nice long summery white dress (that I don't have, of course...)

And with my favorite low-rise jeans!
MORE NECKTIE CRAFT PROJECTS (using the rest of this very same tie!) :

DIY: How to make a pretty pouch for your iPhone or iPod with an old necktie
I LOVE to be pinned on Pinterest :) I hope you'll share with the world by pinning me if you like what you see here!
I LOVE to be pinned on Pinterest :) I hope you'll share with the world by pinning me if you like what you see here!