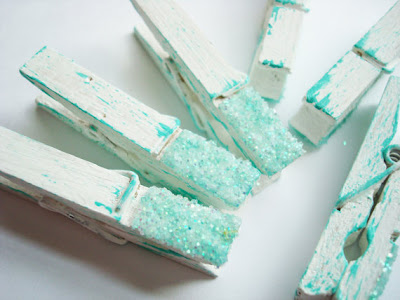
Are you ready for another fun tutorial? Let me show you how I made these cute "Honeydew List" or grocery list holder fridge magnets from popsicle sticks and baby clothespins!
I don't know if you've noticed, but I"ve been on an alocholic popsicles binge lately. The word "hot" no longer seems uncomfortable enough to describe this awful feeling like I put on damp hot clothes and can't escape, even inside my own house (where my A/C seems to have given up on this place too). I'm sure walking around naked is an option, but then again...it's really not. So, my answer to this obnoxious summer heat is to come up with delicious frozen treats that contain just enough happy juice to "take the edge off" the sweltering heat while I pretend I have a beautiful ice cold pool that I can float in anytime I want. Won't you join me??
Combine wine, peaches, and orange juice in a blender and process until smooth. Pourthe blended mixture into your popsicle molds and place in the freezer for about 1.5 hours uncovered without the sticks or popsicle mold tops.
Insert the wooden popsicle sticks after the pops have had time to set up a little, so you can place them directly in the center and they will stay upright. Allow to freeze 3-4 more hours.
NOTES: * I used Pinot Grigio, as that's what I had on hand. You could also use champagne, as that's what traditional bellinis are made with, or another sweet non-sparkling white wine such as Riesling if you want a sweeter popsicle. Mine turned out perfectly for my own taste, as the peaches and orange juice add enough sugar to balance the wine well. I prefer using wooden sticks to the plastic handles that come with the molds I use, because they stick better; the plastic ones tend to come out when you're trying to extract the pops from the molds, or if you're swift enough to manage it otherwise, the popsicles fall off halfway through eating. Not good! You can use cling film to cover the end of each mold so they're not unprotected in the freezer; just wait until they are completely frozen with the sticks in place, then use the stick to poke a hole in the plastic and wrap tight.
This month's Etsy Fort Worth Upcycle THIS! Craft Challenge 'secret ingredient' is popsicle sticks. I have been making popsicles like crazy (and eating them like crazy) so I could use the sticks for this project...you know, so they would be officially 'upcycled'.
I'm really excited about the way these cute little bracelets turned out, and I can't wait to show you how I made them!
TOOLS & SUPPLIES:
• popsicle sticks (1 stick will make 2 bracelets)
• craft knife
• ruler
• power drill with 1/32" drill bit
• fine sandpaper (120-240 grit)
• round needle file (optional)
• container with water
• wide rubber bands
• cylindrical drinking glass (around 3" in diameter)
• paintbrush
• toothpick
•Krylon Crystal Clear gloss finish spray (optional)
• 32" 1mm leather or cord (cut into 2 16 inch pieces)
• acrylic paints
• *scrapbook paper (small scraps, at least 3/4" x 2 3/4")
• *Mod Podge
* You can either paint the wood with your own special design, or decoupage using the scrapbook paper and Mod Podge. If you choose the second option, we will still be using the acrylic paint to finish the back of the wooden pieces.
INSTRUCTIONS:
First, if you are using used popsicle sticks, wash them well and make sure they are completely dry.
Use the ruler to find the center of the stick. Mine was at 2.25". Use the craft knife to cut the wood in half. You will have to go over your cut several times. Do yourself a favor and make sure your blade is new and it will be a lot easier :) When you're about halfway through, you can flip it over and continue cutting from the other side, but whatever you do, don't be tempted to snap it when it's almost done, or it will splinter and you'll swear and throw things across the room.
I'm not saying I did that or anything... but I could imagine that somebody might..
Next, use the drill to make holes in the middle of each end, about 1/8 of an inch in. Run the drill as slowly as possible to avoid splitting the wood, which may or may not have happened to me. Twice. Again, a less ladylike and well composed woman than myself might be tempted to shout profanities and begin tossing things about, but I can assure you that I held my composure...especially since there are no living witnesses to tell you otherwise.
(NOTE: this is why I drill the wood before rounding off the end...)
Use the knife to round off the cut end of the popsicle stick. You may want to use another rounded end and trace it with a pencil for guidance. Don't try to take the whole curve in one swoop; shave off small bits at a time and you'll have better control of the curve.
Smooth the freshly shaped end with the sandpaper to take care of any bumps or splinters. I sanded the other end as well, so they both matched as closely as possible. Try to take care of the splinters around the drill hole as much as possible too, and if you happen to have a round needle file, this would be an excellently awesome time to use it!
When you are satisfied with the shape and smoothness of your wooden pieces, it's time to let them soak! I filled a plastic container about an inch high with warm water and let the wood soak overnight. If you are in a hurry, you can toss them in a pan with water and let them boil for 10-15 minutes, then let them soak for another hour or two in the warm water after you turn off the heat.
We are soaking the wood to make the pieces pliable, so we can give them a nice curve to fit on a wrist better. This step is optional, especially if you want to make your wooden centerpiece shorter...or if you want to make earrings or a pendant.
After the wood has soaked enough to make it easy to bend slightly with your fingers, use the widest rubber bands you can find to strap them tightly to a (cylindrical object about 2.75 - 3" in diameter). Use your thumbs to press the ends around the glass and encourage the curve, and leave them to dry for a few hours. Using a hair dryer will speed up this process, but make sure they are completely dry before moving on to the next step.
Now that your popsicle stick pieces are nicely curved and dry, you can either paint them with the acrylic paints, or decoupage them with Mod Podge and scrapbook paper. I'll show you the latter.
First, paint the back of the wooden pieces with the color of your choice and let it dry. You'll notice from the first photo below that I didn't do it in this order the first time, but it's much easier to paint the back and sides before the paper is in place so you don't have to worry about overpainting. Again...just saving you some headaches.
When the paint is dry, paint some Mod Podge on the top of your bracelet piece, then turn it over and lay it on the back of the piece of scrapbook paper you have chosen. Press the paper to fit the curve of the wood and let it dry before cutting the excess off with the craft knife.
Use the toothpick to gently poke through the paper from the back of the centerpiece, just slightly so you can see where the hole is. Then push the toothpick through the hole from the front of the piece, and twist it and push it all the way through the hole so it tucks the edges of the paper inside the hole nicely. Repeat for the other end.
Paint another one to two coats of Mod Podge over the top and sides (make sure you get the edges of the paper where it meets the wood), letting the piece dry between coats.
OPTIONAL: Spray the front of the finished piece with 2 coats of Krylon Crystal Clear gloss coat, allowing to dry between coats and according to the instructions on the can. I always finish my decoupage pieces this way, to give them a nice glossy shine and seal them well. I do the same for the painted pieces.
When everything has dried completely (and I mean completely - don't even think about touching this thing if it ain't dry or you'll ruin it with fingerprints, and don't come crying to me for sympathy), grab a 16" section of cord and thread it through one of the holes. Tie a knot using both strands together and secure it firmly near the edge of the wood. Repeat for the other end with the other piece of cord or leather.
Cross the ends in the middle, then loop one end around the other side of the cord and tie a knot around it. Pull it as tightly as you can to secure it well but so that it will still slide up and down on the other piece of leather for an adjustable closure. Repeat on the other side, knotting the other end of the cord around the opposite side of the cord. Trim the excess cord, leaving about 1/4" of the ends sticking out. You can snip these closer if you want to glue the knots, just be careful to glue only the outside of the knot so it will still slide well enough to work; you don't want to glue it in place. (If you glue, use hypocement or superglue).
That's it! You're all done, wasn't that awesome?? I had so much fun with this project I made three different bracelets, and next I'm going to make a pendant for a necklace.
I'd love to see your projects, please feel free to leave links to your own upcycled popsicle stick creations in the comments below, and of course I wouldbe honored if you'd like to link back to this tutorial on your own blog, especially if it has inspired you to post one of your own! However, if you'd like to include a photo, please only use the photos of the finished bracelets, not any of the step-by-step or in-progress shots without asking first. If you have any questions at all, please ask - I don't bite (too hard) :)
This is going to sound crazy, but I actually was inspired to try this manicure by my favorite flavor of ice cream. I have a lovely mint colored polish, which I used last week in my Mint and White Chevron Manicure (so I guess I have mint on the brain...), and I have a cool glittery black polish...and I thought hmmm, I wonder if I can recreate that look?
Anyway, as kooky as it seems, I was determined to try it. I thought it would make for an edgy funky look that was exactly what I was in the mood for. I think I like it! Of course, this technique can be used in any combination of colors, so if you're not a fan of mint chocolate chip don't let that stop you!
This technique is especially awesome for covering up a marred mani; you know, stupid sheet marks or fingerprints in your polish...? I know it all too well. This is a pretty easy quick fix so you don't have to start all over again!
Want to try it? Here's how!
TOOLS & SUPPLIES:
• 2 colors nail polish • clear top coat nail polish • plastic wrap / cling film • small paint brush or q-tip
• nail polish remover
INSTRUCTIONS:
1.) First paint your nails as you normally would with two coats of the color you want to use as your base. (I used Essie Mint Candy Apple). Let this dry completely. Overnight is best, but at least let the polish cure for several hours.
2.) When your nails are dry, crumple your piece of cling film up into a little ball. Use your accent color (mine is Pure Ice: Electric!) to paint on the wrinkled surface, sporadically, as shown below.
3.) Press the painted plastic wrap onto each nail, one or two times (moving slightly each time) in a stamping or blotting motion. Add more paint to the plastic as necessary. I think I only reapplied once, after the first hand was complete.
4.) When all nails have been 'stamped', discard the plastic wrap and allow your nails to dry completely.
5.) In the meantime, you can take care of any mess you made; Dip a small paintbrush or q-tip in nail polish remover and clean up around your nails any polish that got on your skin and cuticles.
6.) Finish the manicure with one or two coats of the clear top coat of choice.
7.) Enjoy your funky new nail art and get ready for compliments!
Yesterday I had the wildest random urge to photograph some strawberries. Except, I didn't have any strawberries, so I went to the store to get some so I could fulfill this strange need...even though I was in the middle of painting the bathroom. Of course, I like to eat strawberries too, but it wasn't the taste I was craving; I just had to see that color! It was almost as if my day wouldn't quite be complete if I didn't behold that beautiful juicy glossy red hue...
I know, what a weirdo!! But hey, I'm an artist. (That's what I say any time looks at me like I'm the nuttiest person in the world. I am sensing that you are sort of looking at me like that right now).
Anyway, I configured my fancy lighting set up with natural light from the window and a reflector of tin foil and proceeded to snap away. The photos looked so amazing in the camera, but I was sorely disappointed upon uploading them and seeing them on screen.
Maybe I just didn't have enough contrast or something, and my exposure was off, but they didn't really pop the way I wanted them to. So I did a little playing around in photoshop to bring out the glorious berries I was craving. I ended up with a pretty 'watercolor' painting (above).
Then I thought, wouldn't it be cool if I could figure out how to show the progression in an animation, starting with my crappy photo and turning in to a luscious bowl of beauteous berries? So, since I was already procrastinating on my bathroom painting by photographing fruit on a whim, I thought I'd better go all out and learn how to do it. So I did. And here it is!
And below, you can see the before and after photos:
I think I'll print it and frame it and hang it in the bathroom when it's finished...whenever that might be (?)
I've been having some fun with trying my hand at nail art recently. I LOVE the way my Stars and Stripes Manicure turned out for the 4th of July, so this time I thought I'd play around with some of the things I've been seeing a lot of lately; chevrons and the mint and white color combo. I pictured this as a perfectly summery manicure, and I was right. I like the way this one turned out too! TOOLS & SUPPLIES: • 2 colors nail polish • clear top coat nail polish • sticky labels • ruler / straight edge • pencil / pen • scissors • toothpick (optional) • tweezers (optional) INSTRUCTIONS:
First paint your nails as you normally would with two coats of the color you want to use as your base. (I used Essie Mint Candy Apple). Let this dry completely. Overnight is best, but at least let the polish cure for several hours so you don't mar the surface. Next, cut a strip of sticky label about 1 inch wide and 5 or 6 inches long (depending on how many stripes you want to make, and how thick). Use the ruler to find the midpoint and mark it, then draw a straight line up the middle of the length of the strip.
Draw a line from one of the corners to meet the midline at an angle of your choice. The more sharp the angle, the more dramatic. Draw a similar line from the other corner to complete a triangle. Decide how thick you want your strips to be. Remember, the strips represent the negative space, or the base color that you have already painted on your nails. Copying the angle of the first chevron, draw your lines the rest of the way up the strip. I just eyeballed it but you could use a ruler, or even cut the first piece off and use it as a template to trace. Cut all your chevrons out before you move on and start painting. I used 2 on each nail, so I cut 20 strips. Peel the back of one of your chevron pieces and place it on the nail as near to center as possible and press down firmly. Make sure the point is stuck down well, and that the part of the strip that overlaps is pressed down into the cuticle. You can use a toothpick to help push it down into the crease.
Apply all the strips to all your nails before you begin painting so you don't have to fiddle with peeling the backs of the labels with wet nails (please...learn from my mistake :) Paint two coats of your accent color (I used OPI Alpine Snow), painting over the label. Paint normally, along the length of the nail as if the stickers weren't even there; it's too awkward to paint side to side and you can get strange streaks. Remove the labels while the nail polish is still wet. I use tweezers to grab the ends and pull them off to prevent ruining the finish. When the second color has dried, finish with one or two coats of a clear top coat of choice.
That's it! I hope you'll give this a try and have fun playing around with different colors. Which ones will you try first? Want to learn some more nail art tricks? See my Stars and Stripes Manicure and my "Mint Chocolate Chip" Nail Art Tutorial for some new techniques!


 Combine wine, peaches, and orange juice in a blender and process until smooth.
  I prefer using wooden sticks to the plastic handles that come with the molds I use, because they stick better; the plastic ones tend to come out when you're trying to extract the pops from the molds, or if you're swift enough to manage it otherwise, the popsicles fall off halfway through eating. Not good!


 Want to learn some more nail art tricks? See my Stars and Stripes Manicure and my "Mint Chocolate Chip" Nail Art Tutorial for some new techniques!