Sunday, August 18, 2013

Easy DIY Bridal Shoe Hack - 3 Ways! {Video}

Easy DIY Bridal Shoe Hack - 3 ways {video)


I won't lie. I did NOT enjoy shopping for shoes for my wedding. Like, at ALL. I knew exactly what I wanted and I couldn't find them anywhere. Not even online. All I wanted was a simple open-toed strappy nude or ivory wedge heel with just the tiniest touch of something special. Is that asking too much??

No bling, no glitter, no lace, no stiletto heel, no patent leather or cheap looking satin...just something comfortable, something simple, and hopefully even something so simple I could maybe wear them again (what a novel idea!!)

Oh, and I didn't want to pay $400 either, soooo....there's that. 

After spending way too many hours scouring the internet and an entire day and a half running all over town trying on shoes until my little piggies hurt, I gave up and went to Target to see if they had any leather sandals to replace my favorite pair that broke....and to give my feet something comfortable for the drive home. 

Well lo and behold...guess what? I saw the perfect wedding shoe just sitting there on the shelf, coyly waiting for me as I turned down the aisle. Pale faux suede with a lovely curved wedge and ankle strap, just asking for a little DIY embellishment. 

Shock and awe! My size? What an amazing turn of events! And comfortable too? And under $30?? SERIOUSLY? Score. Happy dance. Smiley face. And I can guaran-dam-tee ya I'll be wearing these babies again too. I love them!

If you're on mobile device and can't see the embedded video, you can watch my Easy DIY Bridal Shoe Hack video on YouTube.


HOW TO:

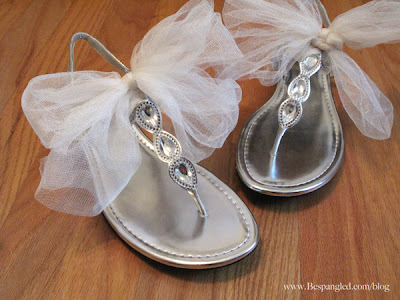
So, as you can see, this was ridiculously simple. I just grabbed a yard of 6" wide tulle ribbon (available in tons of fun colors besides white and ivory) and doubled it over, lengthwise. Then I used it to tie around the shoe or around my ankle. Of course, repeat for the other side. Trim ends as necessary, and that's it. Under 2 minutes. Done!

The most difficult part is deciding which way I want to wear them!  My dress is a tea-length gown, so it ends about 6" above my ankle. What do you think? I'd love to hear your opinion!

Easy DIY Bridal Shoe Hack - 3 ways {video)


And, bonus!! I found myself a pair of cute sandals (on sale) to change into as the night winds down. All in? About $50 for two pairs of shoes for my wedding that I will definitely wear again (though, probably without the tulle). I'm a happy girl.

cute way to dress up a pair of sandals to change into at your wedding reception


Stay tuned for more DIY wedding stuff - I've got tons more planned. Coming soon: my bridal necklace tutorial, pretty bridal hair comb tutorial, and some DIY crepe paper rose pomanders. And if you missed it, check out my Mason Jar Hanging Lanterns Tutorial. 

See y'all soon!


I linked up at:

Friday, August 16, 2013

Easy DIY Heart Shaped Jewelry Display

Easy DIY Heart Shaped Jewelry Display for craft shows


Last year, just before Valentine's Day, I posted this How to Draw a Heart Without a Template Tutorial.  I had all but forgotten all about it when I saw a comment pop up from a reader who had followed the instructions to make a jewelry display for an upcoming craft show!

"Brilliant!" I thought. What a great idea! I asked if she would email me some photos so I could see them and share. And she did!

Thank you, Faye, for sending in these photos and allowing me to share your awesome idea. Wishing you every success at your very first craft show :)

If you'd like to make a jewelry display like this, start by drawing your heart shape on a piece of foam posterboard. If you don't want to freehand it, my tutorial shows you how to draw a perfectly symmetrical heart very easily!

Easy DIY Heart Shaped Jewelry Display for craft shows

Cut around the heart shape carefully with a craft knife.

Easy DIY Heart Shaped Jewelry Display for craft shows

Choose your fabric - felt, velvet, or anything you like! and make sure you have plenty of excess fabric overlapping all the edges - at least 5 inches. Attach the fabric to the heart using hot glue, stretching it tight as you go around the edges.

You can always trim off extra after the glue is set firmly. If you'd like to cover the back completely, you can cut another piece of fabric using the heart as a template, and just glue that on top of the folded over fabric.


Easy DIY Heart Shaped Jewelry Display for craft shows

You can cut and attach a triangular shaped piece of foamboard to the back as a stand, but something sturdier like a wooden or metal bracket might be better, especially for an outdoor show where wind might be a concern.

Easy DIY Heart Shaped Jewelry Display for craft shows

Thanks again, Faye, for sharing your process and your beautiful jewelry! I love these necklaces and I think they look great on this display :)