This is going to sound crazy, but I actually was inspired to try this manicure by my favorite flavor of ice cream. I have a lovely mint colored polish, which I used last week in my Mint and White Chevron Manicure (so I guess I have mint on the brain...), and I have a cool glittery black polish...and I thought hmmm, I wonder if I can recreate that look?
Anyway, as kooky as it seems, I was determined to try it. I thought it would make for an edgy funky look that was exactly what I was in the mood for. I think I like it! Of course, this technique can be used in any combination of colors, so if you're not a fan of mint chocolate chip don't let that stop you!
This technique is especially awesome for covering up a marred mani; you know, stupid sheet marks or fingerprints in your polish...? I know it all too well. This is a pretty easy quick fix so you don't have to start all over again!
Want to try it? Here's how!
TOOLS & SUPPLIES:
• 2 colors nail polish
• clear top coat nail polish
• plastic wrap / cling film
• small paint brush or q-tip
• nail polish remover
INSTRUCTIONS:
1.) First paint your nails as you normally would with two coats of the color you want to use as your base. (I used Essie Mint Candy Apple). Let this dry completely. Overnight is best, but at least let the polish cure for several hours.
INSTRUCTIONS:
1.) First paint your nails as you normally would with two coats of the color you want to use as your base. (I used Essie Mint Candy Apple). Let this dry completely. Overnight is best, but at least let the polish cure for several hours.
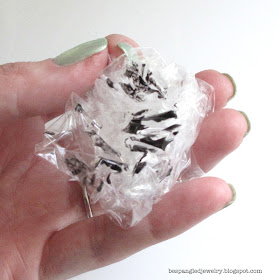
2.) When your nails are dry, crumple your piece of cling film up into a little ball. Use your accent color (mine is Pure Ice: Electric!) to paint on the wrinkled surface, sporadically, as shown below.
3.) Press the painted plastic wrap onto each nail, one or two times (moving slightly each time) in a stamping or blotting motion. Add more paint to the plastic as necessary. I think I only reapplied once, after the first hand was complete.
4.) When all nails have been 'stamped', discard the plastic wrap and allow your nails to dry completely.
5.) In the meantime, you can take care of any mess you made; Dip a small paintbrush or q-tip in nail polish remover and clean up around your nails any polish that got on your skin and cuticles.
6.) Finish the manicure with one or two coats of the clear top coat of choice.
7.) Enjoy your funky new nail art and get ready for compliments!

More Like This:


No comments:
Post a Comment